Wednesday 31 May 2023

Fhex - A Full-Featured HexEditor

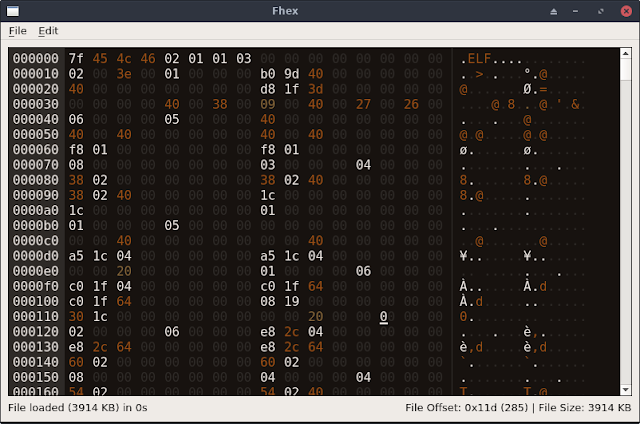
This project is born with the aim to develop a lightweight, but useful tool. The reason is that the existing hex editors have some different limitations (e.g. too many dependencies, missing hex coloring features, etc.).


This project is based on qhexedit2, capstone and keystone engines. New features could be added in the future, PRs are welcomed.

Features
  • Chunks loader - Used to load only a portion of large files without exhaust the memory (use alt + left/right arrows to move among chunks). Please note that in chunk mode, all the operations (e.g. search) applies only to the current chunk except for file save (the entire file is saved). However, each time you edit a chunk, save it before to move to another chunk, otherwise you will lose your changes.
  • Search and replace (UTF-8, HEX, regex, reverse search supported) [CTRL + F]
  • Colored output (white spaces, ASCII characters, 0xFF, UTF-8 and NULL bytes have different colors)
  • Interpret selected bytes as integer, long, unsigned long [CTRL + B]
  • Copy & Paste [CTRL + C and CTRL + V]
  • Copy selected unicode characters [CTRL + Space]
  • Zeroing all the selected bytes [Delete or CTRL + D]
  • Undo & Redo [CTRL + Z and CTRL + Y]
  • Drag & Drop (Hint: Drag&Drop two files to diff them)
  • Overwrite the same file or create a new one [CTRL + S]
  • Goto offset [CTRL + G]
  • Insert mode supported in order to insert new bytes instead to overwrite the existing one [INS]
  • Create new instances [CTRL + N]
  • Basic text viewer for the selected text [CTRL + T]
  • Reload the current file [F5]
  • Compare two different files at byte level
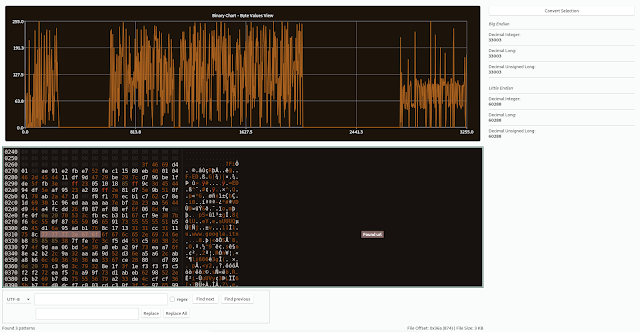
  • Browsable Binary Chart (see later for details) [F1]
  • Hex - Dec number converter [F2]
  • Hex String escaper (e.g from 010203 to \x01\x02\x03) [F3]
  • Pattern Matching Engine (see later for details)
  • Disassebler based on Capstone Engine [F4]
  • Assembler based on Keystone Engine [F4]
  • Zoom-Out/Zoom-In bytes view (CTRL + Up/Down or CTRL + -/+)
  • Shortcuts for all these features
Pattern Matching Engine

Fhex can load at startup a configuration file (from ~/fhex/config.json) in JSON format with a list of strings or bytes to highlight and a comment/label to add close to the matches.

Examples:

{
"PatternMatching":
[
{
"string" : "://www.",
"color" : "rgba(250,200,200,50)",
"message" : "Found url"
},
{
"bytes" : "414243",
"color" : "rgba(250,200,200,50)",
"message" : "Found ABC"
}
]
}

To activate pattern matching press CTRL + P At the end, Fhex will show also an offset list with all the result references. Note: Labels with comments are added only if the window is maximized, if labels are not displayed correctly please try to run pattern matching again.

Binary Chart

Fhex has the feature to chart the loaded binary file (Note: In order to compile the project, now you need also qt5-charts installed on the system). The y-axis range is between 0 and 255 (in hex 0x0 and 0xff, i.e. the byte values). The x-axis range is between 0 and the filesize.

The chart plots the byte values of the binary file and let you focus only on the relevant sections. For example, if in a binary file there is an area full of null bytes, you can easily detect it from the chart.

License

GPL-3


Continue reading


Hashdb-Ida - HashDB API Hash Lookup Plugin For IDA Pro


HashDB IDA Plugin

Malware string hash lookup plugin for IDA Pro. This plugin connects to the OALABS HashDB Lookup Service.


Adding New Hash Algorithms

The hash algorithm database is open source and new algorithms can be added on GitHub here. Pull requests are mostly automated and as long as our automated tests pass the new algorithm will be usable on HashDB within minutes.


Using HashDB

HashDB can be used to look up strings that have been hashed in malware by right-clicking on the hash constant in the IDA disassembly view and launching the HashDB Lookup client.


Settings

Before the plugin can be used to look up hashes the HashDB settings must be configured. The settings window can be launched from the plugins menu Edit->Plugins->HashDB.


Hash Algorithms

Click Refresh Algorithms to pull a list of supported hash algorithms from the HashDB API, then select the algorithm used in the malware you are analyzing.


Optional XOR

There is also an option to enable XOR with each hash value as this is a common technique used by malware authors to further obfuscate hashes.


API URL

The default API URL for the HashDB Lookup Service is https://hashdb.openanalysis.net/. If you are using your own internal server this URL can be changed to point to your server.


Enum Name

When a new hash is identified by HashDB the hash and its associated string are added to an enum in IDA. This enum can then be used to convert hash constants in IDA to their corresponding enum name. The enum name is configurable from the settings in the event that there is a conflict with an existing enum.


Hash Lookup

Once the plugin settings have been configured you can right-click on any constant in the IDA disassembly window and look up the constant as a hash. The right-click also provides a quick way to set the XOR value if needed.


Bulk Import

If a hash is part of a module a prompt will ask if you want to import all the hashes from that module. This is a quick way to pull hashes in bulk. For example, if one of the hashes identified is Sleep from the kernel32 module, HashDB can then pull all the hashed exports from kernel32.


Algorithm Search

HashDB also includes a basic algorithm search that will attempt to identify the hash algorithm based on a hash value. The search will return all algorithms that contain the hash value, it is up to the analyst to decide which (if any) algorithm is correct. To use this functionality right-click on the hash constant and select HashDB Hunt Algorithm.


All algorithms that contain this hash will be displayed in a chooser box. The chooser box can be used to directly select the algorithm for HashDB to use. If Cancel is selected no algorithm will be selected.


Dynamic Import Address Table Hash Scanning

Instead of resolving API hashes individually (inline in code) some malware developers will create a block of import hashes in memory. These hashes are then all resolved within a single function creating a dynamic import address table which is later referenced in the code. In these scenarios the HashDB Scan IAT function can be used.


Simply select the import hash block, right-click and choose HashDB Scan IAT. HashDB will attempt to resolve each individual integer type (DWORD/QWORD) in the selected range.


Installing HashDB

Before using the plugin you must install the python requests module in your IDA environment. The simplest way to do this is to use pip from a shell outside of IDA.
pip install requests

Once you have the requests module installed simply copy the latest release of hashdb.py into your IDA plugins directory and you are ready to start looking up hashes!


Compatibility Issues

The HashDB plugin has been developed for use with the IDA 7+ and Python 3 it is not backwards compatible.


Related word

How To Switch From 32-Bit Windows 10 To 64-Bit Windows 10

Microsoft offers Windows 10 as a free upgrade for computers running a genuine copy of Windows 7 or Windows 8.1. Also, similar to previous releases, the operating system is available on different editions and two versions: 32-bit and 64-bit.While upgrading from Windows 10 Home to Windows 10 Pro is not free, what many people are unfamiliar with is that Microsoft won't ask for more money to upgrade from a 32-bit to a 64-bit version.
However, the upgrade path only allows moving from a qualifying version to its equivalent edition on the same architecture. This limit means that if your PC is running a 32-bit version of Windows 8.1, after the upgrade you'll be stuck with the 32-bit version of Windows 10 — even if your computer's processor can handle the 64-bit version. The only solution is to make a clean installation of the operating system and reconfigure all your apps and settings.
iemhacker-how-to-switch-from-32-bit-windows-to 64bit
In this Windows 10 guide, we'll walk you through the steps to verify whether your computer in fact includes support for a 64-bit version and we'll guide you through the upgrade process to Windows 10 (x64).

Make sure Windows 10 64-bit is compatible with your PC

A 64-bit version of Windows can only be installed on computers with capable hardware. As such, the first thing you need to do is to determine whether your computer has a 64-bit processor.
You can easily get this information from the Settings app.
  1. Use the Windows key + I keyboard shortcut to open the Settings app.
  2. Click System.
  3. Click About.
  4. Under System type, you will see two pieces of information: if it says 32-bit operating system, x64-based processor, then it means that your PC is running a 32-bit version of Windows 10 on a 64-bit processor. If it says 32-bit operating system, x86-based processor, then your computer doesn't support Windows 10 (64-bit).

Make Sure Your Processor is 64-bit Capable

First thing's first. Before even thinking of upgrading to 64-bit Windows, you'll need to confirm that the CPU in your computer is 64-bit capable. To do so, head to Settings > System > About. On the right-hand side of the window, look for the "System type" entry.

You'll see one of three things here:

  • 64-bit operating system, x64-based processor. Your CPU does support 64-bit and you already have the 64-bit version of Windows installed.
  • 32-bit operating system, x86-based processor. Your CPU does not support 64-bit and you have the 32-bit version of Windows installed.
  • 32-bit operating system, x64-based processor. Your CPU supports 64-bit, but you have the 32-bit version of Windows installed.
If you see the first entry on your system, you don't really need this article. If you see the second entry, you won't be able to install the 64-bit version of Windows on your system at all. But if you see the last entry on your system—"32-bit operating system, x64-based processor"—then you're in luck. This means you're using a 32-bit version of Windows 10 but your CPU can run a 64-bit version, so if you see it, it's time to move on to the next section.
Make Sure Your PC's Hardware Has 64-bit Drivers Available
Even if your processor is 64-bit compatible, you might want to consider whether your computer's hardware will work properly with a 64-bit version of Windows. 64-bit versions of Windows require 64-bit hardware drivers, and the 32-bit versions you're using on your current Windows 10 system won't work.
Modern hardware should certainly offer 64-bit drivers, but very old hardware may no longer be supported and the manufacturer may have never offered 64-bit drivers. To check for this, you can visit the manufacturer's driver download web pages for your hardware and see if 64-bit drivers are available. You shouldn't necessarily need to download these from the manufacturer's website, though. They are likely included with Windows 10 or automatically will be downloaded from Windows Update. But old hardware—for example, a particularly ancient printer—simply may not offer 64-bit drivers.

Upgrade by Performing a Clean Install

You'll need to perform a clean install to get to the 64-bit version of Windows 10 from the 32-bit one. Unfortunately, there's no direct upgrade path.
Warning: Back up your important files before continuing and also make sure you have what you need to reinstall your programs. This process will wipe your whole hard disk, including Windows, installed programs, and personal files.
First, if you haven't upgraded to Windows 10 yet, you'll need to use the upgrade tool to upgrade. You'll get the 32-bit version of Windows 10 if you were previously using a 32-bit version of Windows 7 or 8.1. But the upgrade process will give your PC a Windows 10 license. After upgrading, be sure to check that your current 32-bit version of Windows 10 is activated under Settings > Update & security > Activation.
Once you're using an activated version of the 32-bit Windows 10, download the Windows 10 media creation tool from Microsoft. If you're using the 32-bit version of Windows 10 at the moment, you'll have to download and run the 32-bit tool.
When you run the tool, select "Create installation media for another PC" and use the tool to create a USB drive or burn a disc with Windows 10. As you click through the wizard, you'll be asked whether you want to create 32-bit or 64-bit installation media. Select the "64-bit (x64)" architecture.
Next, restart your computer (you did back everything up, right?) and boot from the installation media. Install the 64-bit Windows 10, selecting "Custom install" and overwriting your current version of Windows. When you're asked to insert a product key, skip the process and continue. You'll have to skip two of these prompts in total. After you reach the desktop, Windows 10 will automatically check in with Microsoft and activate itself. You'll now be running the 64-bit edition of Windows on your PC.
If you want to go back to the 32-bit version of Windows, you'll need to download the media creation tool—the 64-bit version, if you're running the 64-bit version of Windows 10—and use it to create 32-bit installation media. Boot from that installation media and do another clean install—this time installing the 32-bit version over the 64-bit version.

Final Words :

Finally, you are aware of the way through which you could be able to switch from the 32-bit windows to 64-bit windows really easily. There will be no difference in the functions or the working of the windows yet the only change that you will get is the more advanced architecture that is compatible with numerous high-end apps. If you are thinking to switch your windows to the 64-bit version then make sure you first check for your hardware compatibility. Hopefully, you would have liked the information of this post, please share this post with others if you really liked it. Provide us your valuable views regarding this post through using the comments section below. At last nevertheless thanks for reading this post!
Related word

  1. Hacker Techniques Tools And Incident Handling
  2. Pentest Tools Free
  3. Hack Tools For Ubuntu
  4. Pentest Tools Website Vulnerability
  5. Nsa Hack Tools
  6. How To Make Hacking Tools
  7. Hack Tools Pc
  8. New Hacker Tools
  9. Hackers Toolbox
  10. Hacker Tools For Mac
  11. Hacks And Tools
  12. Hacker Techniques Tools And Incident Handling
  13. Pentest Tools Github
  14. Hacker
  15. Hacker Hardware Tools
  16. Hack Tool Apk
  17. Game Hacking
  18. Hacking Tools Usb
  19. Tools For Hacker
  20. Kik Hack Tools
  21. Hacker Tools For Mac
  22. How To Hack
  23. Pentest Tools For Android
  24. Hacker Tools 2019
  25. Pentest Tools Framework
  26. Free Pentest Tools For Windows
  27. Hacking Tools For Beginners
  28. Hacking Tools For Mac
  29. Hacking Tools For Mac
  30. Computer Hacker
  31. Hacker Tools Windows
  32. Termux Hacking Tools 2019
  33. Pentest Tools Subdomain
  34. Hacking Tools Download
  35. How To Make Hacking Tools
  36. Pentest Tools List
  37. Hacker Tools List
  38. Hackers Toolbox
  39. How To Install Pentest Tools In Ubuntu
  40. Termux Hacking Tools 2019
  41. Hacking Tools Mac
  42. Hacking Tools Online
  43. Hacker Tools Hardware
  44. Hack Tool Apk
  45. Underground Hacker Sites
  46. Pentest Tools Subdomain
  47. Hacker Tools Online
  48. Hacker Search Tools
  49. Best Pentesting Tools 2018
  50. Hacker Tools List
  51. Pentest Tools
  52. Hacker Tools
  53. New Hack Tools
  54. Hacker Tools For Ios
  55. Hacker Hardware Tools
  56. Hacker Tools For Ios
  57. Hack Tools
  58. Hacker Tools Linux
  59. Hack Tools For Windows
  60. Pentest Tools For Android
  61. Hacker Tools For Windows
  62. Hacking Tools For Kali Linux
  63. World No 1 Hacker Software
  64. Tools For Hacker
  65. Github Hacking Tools
  66. Pentest Tools For Ubuntu
  67. Pentest Recon Tools
  68. How To Install Pentest Tools In Ubuntu
  69. Hacking Tools For Windows 7
  70. Hacker Tools 2019
  71. Hacker Techniques Tools And Incident Handling
  72. How To Make Hacking Tools
  73. Pentest Tools For Ubuntu
  74. How To Hack
  75. Pentest Tools For Android
  76. Hacker Tools For Pc
  77. Pentest Tools Apk
  78. Pentest Tools Url Fuzzer
  79. Hacking Tools For Beginners
  80. What Is Hacking Tools
  81. Hack Apps
  82. Pentest Tools For Ubuntu
  83. Pentest Tools Port Scanner
  84. Hacking Tools Free Download

Tuesday 30 May 2023

Reversing Some C++ Io Operations

In general decompilers are not friendly with c++ let's analyse a simple program to get familiar with it.
Let's implement a simple code that loads a file into a vector and then save the vector with following functions:

  • err
  • load
  • save
  • main


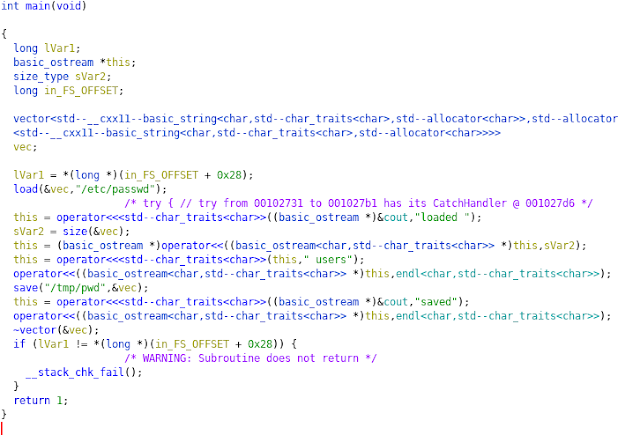
Lets identify the typical way in C++ to print to stdout with the operator "<<"


The basic_ostream is initialized writing the word "error" to the cout, and then the operator<< again to add the endl.


The Main function simply calls  "vec = load(filename)"  but the compiler modified it and passed the vector pointer as a parámeter. Then it bulds and prints "loaded  " << size << " users".
And finally saves the vector to /tmp/pwd and print "saved".
Most of the mess is basically the operator "<<" to concat and print values.
Also note that the vectors and strings are automatically deallocated when exit the function.


And here is the code:


Let's take a look to the load function, which iterates the ifs.getline() and push to the vector.
First of all there is a mess on the function definition, __return_storage_ptr is the vector.
the ifstream object ifs is initialized as a basic_ifstream and then operator! checks if it wasn't possible to open the file and in that case calls err()
We see the memset and a loop, getline read a cstr like line from the file, and then is converted to a string before pushing it to the vector. lVar1 is the stack canary value.

In this situations dont obfuscate with the vector pointer vec initialization at the begining, in this case the logic is quite clear.


The function save is a bit more tricky, but it's no more than a vector iteration and ofs writing.
Looping a simple "for (auto s : *vec)" in the decompiler is quite dense, but we can see clearly two write, the second write DAT_0010400b is a "\n"


As we see, save implememtation is quite straightforward.


More info


  1. Hacker Tools Software
  2. Hacker Tools Github
  3. Hack And Tools
  4. Pentest Tools Alternative
  5. Hackers Toolbox
  6. Hacker Tools For Ios
  7. Hacking Apps
  8. Hacker Search Tools
  9. Hacking Tools 2020
  10. Hacking Tools Download
  11. What Are Hacking Tools
  12. Pentest Tools Kali Linux
  13. Blackhat Hacker Tools
  14. Hack Tools Github
  15. Hacker Tool Kit
  16. Hacking Tools Kit
  17. Hacker
  18. Hacking Tools For Mac
  19. Hack Website Online Tool
  20. Hack Tools For Windows
  21. Hacking Tools For Beginners
  22. Pentest Tools Windows
  23. Ethical Hacker Tools
  24. Hacker Tools Software
  25. Blackhat Hacker Tools
  26. Hack Tools For Mac
  27. Hack Website Online Tool
  28. Hack Tools Online
  29. Pentest Automation Tools
  30. Hacker Search Tools
  31. Hacker Tools Hardware
  32. Hacker Tools Free Download
  33. Hacker Tools Free Download
  34. Pentest Tools For Android
  35. What Are Hacking Tools
  36. How To Hack
  37. Pentest Tools Tcp Port Scanner
  38. Hacking Tools And Software
  39. Best Pentesting Tools 2018
  40. Pentest Tools Find Subdomains
  41. Hacker Tools Free
  42. Hacking Tools For Beginners
  43. Hacking Tools
  44. Hak5 Tools
  45. Hack Tools Online
  46. Hacking Tools For Pc
  47. Hacker Tools Online
  48. Pentest Tools Nmap
  49. Hacking Tools Windows
  50. Hacker Techniques Tools And Incident Handling
  51. Physical Pentest Tools
  52. Hacker Search Tools
  53. World No 1 Hacker Software
  54. Hacking Tools Kit
  55. Hacker Tools 2020
  56. Hack Tools
  57. Hack Website Online Tool
  58. Hacking Tools Name
  59. Pentest Tools Windows
  60. Hack Apps
  61. Pentest Tools For Android
  62. Hack Tools 2019
  63. Best Hacking Tools 2020
  64. Hacker Techniques Tools And Incident Handling
  65. Hacking Tools Kit
  66. Pentest Tools Online
  67. Pentest Tools For Android
  68. Hack Tools For Mac
  69. Hacker Tools Mac
  70. Hacking Tools For Windows Free Download
  71. Pentest Tools Linux
  72. Hacking Tools Windows
  73. Hacker Security Tools
  74. Hacking Tools For Mac
  75. Tools Used For Hacking
  76. Hackrf Tools
  77. Hack Tools Mac
  78. Termux Hacking Tools 2019
  79. Wifi Hacker Tools For Windows
  80. Computer Hacker
  81. Tools For Hacker
  82. Hacker Tools Software
  83. Hacking Tools And Software
  84. Hacker Tools 2019
  85. Pentest Tools Nmap
  86. Pentest Tools Apk
  87. Hacker Search Tools
  88. Underground Hacker Sites
  89. Nsa Hacker Tools
  90. World No 1 Hacker Software
  91. Hacking Tools For Games
  92. Hacking Tools
  93. Hacker Tools Online
  94. Physical Pentest Tools
  95. Hacking Tools For Windows
  96. Tools Used For Hacking
  97. Pentest Tools Windows
  98. Hacking Tools For Games
  99. Hackrf Tools
  100. Hacker Techniques Tools And Incident Handling
  101. Hack Tools For Windows
  102. Termux Hacking Tools 2019
  103. Growth Hacker Tools
  104. Hacker Tools 2019
  105. Hack App
  106. Hacks And Tools
  107. Hacking Tools Free Download
  108. Pentest Automation Tools
  109. Pentest Tools Android
  110. Pentest Reporting Tools
  111. Hacking Tools Software
  112. Hackers Toolbox
  113. Pentest Tools Download
  114. Pentest Tools Port Scanner
  115. Hacking Tools Download
  116. Easy Hack Tools
  117. Pentest Tools Nmap
  118. Hack Tools
  119. Nsa Hacker Tools
  120. Pentest Tools Bluekeep
  121. Hacker Search Tools
  122. Pentest Tools For Mac
  123. Hackrf Tools
  124. Hack Tools For Windows
  125. Tools Used For Hacking